Un piccolo giro tra le varie funzionalità del mio sistema domotico, in attesa di collegare il tutto all’impianto elettrico della

– Smart Domotik – Realizzazione passo passo PARTE 1
– Smart Domotik – Realizzazione passo passo PARTE 2
– Smart Domotik – Realizzazione passo passo PARTE 3
– Smart Domotik – L’hardware che lo gestisce
Questa terza parte è abbastanza breve e riguarda la nuova funzionalità degli “Scenari”.
Permette di eseguire una sequenza di azioni in modo totalmente automatico, in base alle necessità.
Lo stile è quello Metro di Windows 8, molto comodo per eseguire comandi anche dallo smartphone!
Test della funzionalità “Scenari” del mio impianto domotico.
Permette di eseguire una sequenza di azioni in modo totalmente automatico,

– Smart Domotik – Realizzazione passo passo PARTE 1
– Smart Domotik – Realizzazione passo passo PARTE 2
– Smart Domotik – Realizzazione passo passo PARTE 3
– Smart Domotik – L’hardware che lo gestisce
Comincio questa seconda parte relativa al mio Sistema Domotico per parlare dell’impatto che ha rispetto al normale impianto elettrico presente in tutte le case.
Dato che la casa è ancora in costruzione, ho avuto la possibilità di interferire leggermente con quello che doveva essere l’impianto elettrico originale.
L’elettricista è uno abbastanza “all’antica”, che quando gli parli di “Domotica” ti guarda come se gli avessi detto di essere un’alieno venuto sulla terra per portare nuove tecnologie al genere umano…….

– Smart Domotik – Realizzazione passo passo PARTE 1
– Smart Domotik – Realizzazione passo passo PARTE 2
– Smart Domotik – Realizzazione passo passo PARTE 3
– Smart Domotik – L’hardware che lo gestisce
Non sono pratico solitamente a scrivere sul mio sito quello che faccio personalmente, ma questa volta vorrei scrivere qualche riga nel caso qualcuno voglia cimentarsi in tutto questo. 😛
Qualche mese fa ho comprato casa, e dato che è ancora in costruzione ho potuto scegliere molte cose e caratteristiche che la rendessero veramente mia.
Da buon smanettone la prima cosa che ho pensato è stata: Cacchio, voglio un’impianto domotico!!
L’idea si è presto arenata nel momento in cui ho provato a fare un po di conti.. la casa è abbastanza grande (circa 180mq) e un’impianto domotico “decente” si aggirava intorno ai 10-15 mila euro, decisamente troppo con tutte le spese che ho attualmente.
Video del sistema domotico che sto realizzando per la mia nuova casa.
Scusate per la qualità del video, è
One of the first problems encountered when building a mobile web app from scratch is the amount of space consumed by the browser’s address bar. This tutorial will demonstrate how to reclaim the screen real estate otherwise lost to the address bar while accounting for orientation changes, content height problems, and internal document links.
Defining the Problem
One of the most difficult aspects of designing for mobile devices is the limited amount of screen space available. Mobile web applications must be streamlined and intuitive in order to compete with native applications, and the presence of the browser’s user interface often only subtracts from the user experience and the site aesthetic as a whole.
For example, consider the following mobile web site screen shot:

The above screenshot was taken on an iPhone 4 with both the Mobile Safari address bar and toolbar displayed.
By eugenedotnet
Creating horizontal ListBox element is obviously a pretty easy thing to do, but anyway I have decided to post XAML for that.
<ListBox ScrollViewer.HorizontalScrollBarVisibility="Auto">
    <ListBox.ItemsPanel>
        <ItemsPanelTemplate>
            <StackPanel Orientation="Horizontal" />
        </ItemsPanelTemplate>
    </ListBox.ItemsPanel>
    <ListBox.ItemTemplate>
        <DataTemplate>
           <Your control... />
        </DataTemplate>
    </ListBox.ItemTemplate>
</ListBox>Developing for Android is very easy to set up and get started on your computer. However, a gripe shared among others, not just me, is that the Android emulator is too slow. On my old computer, it would take 1-2 minutes for it to boot up. In debugging mode, the response time is very slow.
There are two methods:
- Connect your phone to your computer and find the drivers online (if needed) to allow adb to recognize your phone as a running Android device. Eclipse and the ADT plugin will take care of the rest.
- The super dumb way is to take the .apk file that your Android project generates every time it compiles (at yourappfolder/bin/yourapp.apk), connect your phone to the computer via USB, push it to your phone, and install. But that is also very inefficient (and dumb)! What if you just wanted to test a small change real quick? You would have to keep your phone tethered to the computer, and constantly overwrite your .apk file and re-install your application each time you wanted to test it on your phone.
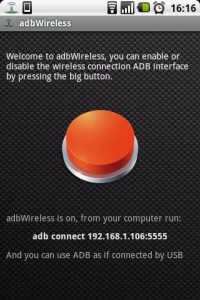
I have a way that allows you to test your Android application on your Android smartphone without physically connecting your phone to your computer. All it requires is a rooted Android smartphone, and a shared wifi network between the computer and the phone.
Note: This method requires a phone with root access, and accessing adb over a wifi network might be a security concern for some. Take this method for what it’s worth. If you are doing this on your own home network that is trusted and encrypted there shouldn’t be a problem, but I would avoid doing this in a public wifi network.
This article is part 3 in a three part series.


